Canning Homemade Meatloaf
Want a smart way to preserve meatloaf so you can enjoy its rich, savory flavor anytime? Canning meatloaf is a convenient option. This guide walks you through the process of safely pressure-canning meatloaf while keeping it flavorful and ready to use whenever you need it.
Ingredients
Before getting started, gather the following ingredients. Each one contributes to both taste and safe preservation:
| Ingredient | Quantity | Notes |
|---|---|---|
| Ground beef (hamburg) | 10 lbs | |
| Garlic cloves | 3 | More can overpower flavor when pressure-canned |
| Onion | ½ | |
| Light brown sugar | 2–3 tbsp | |
| Tomato ketchup | 1¼ cups | |
| Saltine crackers | 1 plastic package | From a box of saltines |
| Parsley | 1 tbsp | |
| Yellow mustard (powder) | 1 tsp | |
| Pepper | 1 tsp | |
| Salt | 2 tsp | |
| Eggs | 8 |
Instructions
Follow each step carefully to ensure your canned meatloaf turns out safe and tasty.
1. Prepare the Jars and Lids
Prepare jars, lids, and bands according to standard canning procedures. Keep the lids in hot water to soften the sealing compound.
2. Combine Ingredients
In a large mixing bowl, thoroughly blend all ingredients until evenly combined.
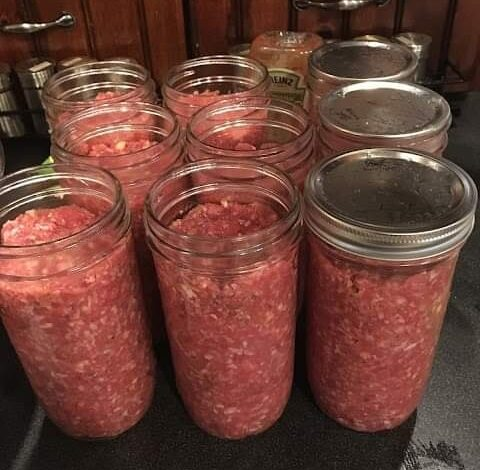
3. Fill the Jars
Pack the meatloaf mixture firmly into the jars, pressing gently to remove air pockets. Leave approximately 1¼ inches of headspace at the top.
4. Clean the Rims
Wipe jar rims clean to ensure a proper seal. Apply the lids and screw the bands on finger-tight—secure but not overly tight.
5. Begin the Canning Process
Place the filled jars into the pressure canner with cold water to prevent temperature shock. Close the canner without the weight and allow steam to vent for 10 minutes to establish a vacuum. Then place the weight on the vent.
6. Regulate Pressure
Bring the canner up to 10 psi, then lower the heat slightly to maintain steady pressure. Process the jars for at least 90 minutes, keeping the pressure consistent.
7. Allow Natural Cooling
Turn off the heat and let the canner cool on its own. Do not remove the weight right away. Allow jars to rest for 24 hours before checking seals.
8. Test the Seals
Remove the bands and gently lift each jar by the lid. A properly sealed lid will remain in place and appear slightly indented.
9. Using the Meatloaf
The juices inside may solidify during storage. To remove the meatloaf easily, gently warm the jar in hot water or reheat briefly in the microwave.
10. Storage Guidelines
Store sealed jars in a cool, dark, and dry location. Any jar that does not seal should be refrigerated and used within two weeks. Once a sealed jar is opened, cover leftovers and consume within two weeks.